
Welcome to our latest blog article series where we bring you the most recent updates from HubSpot in 2024!
In this edition, we'll delve into the exciting new features and improvements rolled out for HubSpot CRM, designed to streamline your workflows, enhance data integrity, and empower your marketing and sales teams like never before.
Let's dive in and explore these updates together!
What's inside:
1. Commenting on Marketing Assets on Mobile
2. Multi-language support for AI Assistant in Conversations Inbox
4. Sequences embedded automation
5. Conditional display logic in CRM Preview sidebar
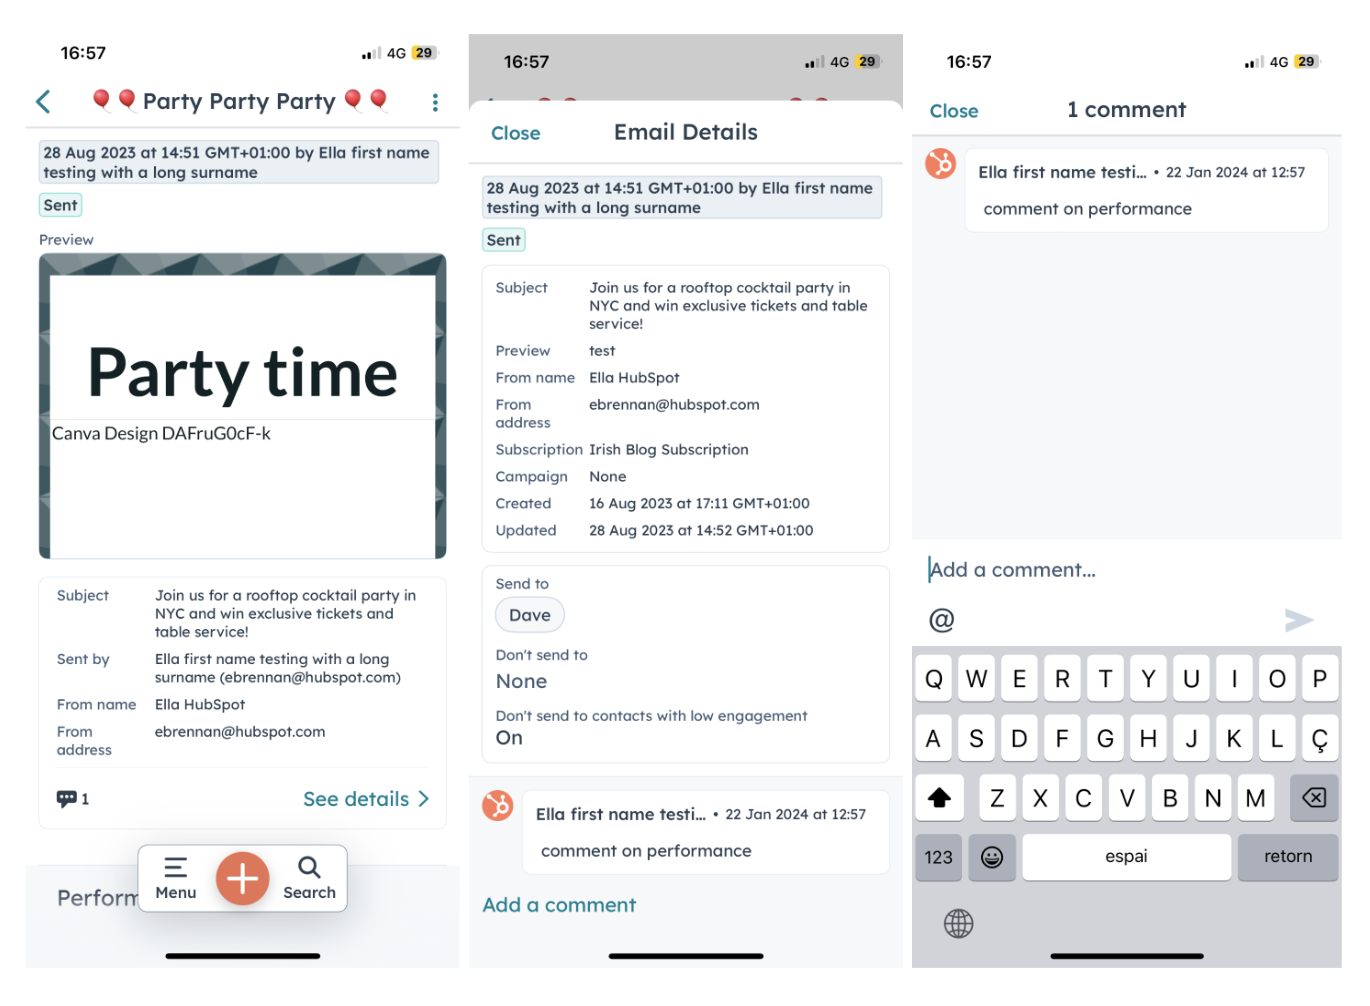
Commenting on Marketing Assets on Mobile
Comments for Marketing are now available on mobile. Commenting allows you to leave messages, tag in teammates for feedback and collaborate together in-app to execute great marketing without ever leaving the HubSpot Mobile App, Android and iOS.
As our daily work moves online more and more, collaboration and seamless teamwork have never been more important. When working on a Social post or Email in HubSpot, you'll often have questions, thoughts or feedback you want to share with your team. Switching to a chat or email app to discuss can be distracting and interruptive.
So now, you have an integrated commenting capability right inside your marketing assets on mobile. Inside social posts, marketing emails and approvals assets you can collaborate with context by tagging teammates in what you're working on, without interrupting your work. According to your colleagues' preferred notification channel, they will be notified with portal notifications, push notifications and emails.
How does it work?
This first release includes a new "Comment" option inside the Details Page of the individual assets, for example, a Social Post, which opens up a panel with comments for that specific asset.
Let’s imagine you are creating a new marketing email and you need support from the designer. By clicking under the “Add comments” CTA you’ll find in the marketing email overview, you will be able to mention your colleague with your request directly there.
Commenting also supports directly @mentioning another user in the account and that user will get a notification via their preferred notification channel. Under the hood this commenting feature is powered by the same commenting system as CRM timeline comments, meaning notification settings are the same. Customers can choose email notifications, mobile notifications, in-app, browser, Slack, etc, found under the "General" bucket of notifications in Settings on Desktop.
Multi-language support for AI Assistant in Conversations Inbox
Multi-language support for AI Assistant in Conversations Inbox will automatically detect the language being used in the composer to return AI generated content in the language in which a user is typing.

As it exists today, the AI Assistants for generating/editing text and summarizing conversations in Inbox return text in the set portal language. This restricts users that may have conversations with contacts in multiple languages and requires manual effort to translate outgoing messages.
Multi-language support will increase efficiency by returning AI generated content in the Inbox in the language used in the composer.
How does it work?
Input text in any language in the Conversations Inbox composer that you’d like to either use as a prompt for a new draft or to edit the text.
When you highlight existing text in the composer to edit or use to draft a message, you'll see an AI icon turn orange in the bottom toolbar. Click on that button, and you'll see a menu of actions you can take to use your highlighted text to:
- Rewrite
- Expand
- Shorten
- Change tone
- Draft a message
When you select one of the options in the menu, AI Assistant will insert your new text into the composer using the language of the original text, where you’ll have the option to make copy edits or adjust formatting, just as you do in the Inbox today.
Edit open invoices
Users can now edit invoices that are in "open" status (aka "finalized").
Previously, when an invoice was open it could not be edited. If the invoice needed to be updated, the user would need to first void the existing invoice, and then create a new invoice. This experience was not ideal and after hearing customer feedback, we have since updated this feature.
Please note: An invoice cannot be edited if there has been a payment made on it.
Examples of when a merchant would edit an open invoice include:
- Correcting errors (e.g., mistyping an address)
- Adding line items, updating quantities, changing pricing (e.g., if their customer changes their order)
- Adding a PO number
How does it work?
Permissions
Super admins can enable / disable editing of open invoices within invoice Settings >> "Allow editing of open invoices".
Checking the box enables editing for anyone who has invoice edit permissions. Permissions for who can view and edit invoices can be found in Users & Teams settings.

Editing
To edit an open invoice, select the invoice, then click Actions >> Edit.
Editing is allowed as long as a payment (partial or full) has not been made on the invoice.

After the changes have been made, select the "Update" button to save.

If the customer happens to be in the process of making a payment while the merchant is making edits, saving the edited invoice will cancel an open checkout. (If the payment is made first, then editing is disabled).
The customer will not be automatically notified of changes. After saving changes, the merchant is given the option of emailing the invoice to their customer. It is up to the merchant to communicate to their customer that the invoice has changed, and what the changes were.
Audit log
In the new History card of the invoice preview, the user can view a timeline of invoice events (status changed, edit made, email sent), who performed the action, and the date and time it occurred.
QBO sync
Edits made to invoices created in HubSpot will be synced to QBO.
Password: Invoices_167888
Sequences embedded automation

Hubspot is adding a new 'Automate' tab to the Sequences tool, allowing users to efficiently create and manage automated enrollment and unenrollment triggers directly from Sequences.
Currently, they offer automated enrollment in two forms:
- Within an individual sequence in the ‘Automation’ tab.
- Within the workflows tool (available to Sales/Service Hub Enterprise only).
While the workflows action has been popular, the 'Automation' tab has struggled with low discoverability, causing its capabilities to be overlooked. Understanding the demand for automated enrollment, especially from Pro customers, we are addressing this challenge by making automated enrollment a core component of Sequences. This is the first step in a larger initiative to improve embedded automation capabilities within Sequences.
Allowing for custom enrollment and unenrollment criteria in sequences allows customers to better automate their sales outreach to match their marketing and sales processes. This update helps sequences dynamically enroll based on marketing intent signals like submitting a form or viewing a website page.
How does it work?
This is available to Sales and Service Hub Pro and Enterprise customers.
Navigate to Automation > Sequences to view the new Automate tab. Users can now view and manage existing automations as well as create new ones all in one place.

Create a new embedded automation in the top right corner and configure the trigger and action. We currently support the following triggers:
- Start or end a sequence when a contact submits a form
- Start or end a sequence when a contact views a page on your website

When enrolling a contact in a sequence, users can configure a delay as well as which user the sequence will send on behalf of.

Once the automation is turned on, contacts will automatically be added or removed from the sequence as soon as they meet the trigger.
Conditional display logic in CRM Preview sidebar
Conditional display logic is now available on the CRM preview sidebar. Admins can now configure property cards to display only when specific criteria is met, just like they can today on the record left sidebar.
Seeing the right data at the right time is critical to a rep's success in HubSpot. Missing irrelevant or too much information can be overwhelming and even hinder the right action from being taken.
Conditional display logic allows admins to customize the CRM Preview sidebar to show only property cards when a specific property value criteria is met. For example, display a property card on the Contact preview only when that Contact is in the "customer" lifecycle stage.
How does it work?
As an admin on any of HubSpot’s products, you can add conditional logic to the preview sidebar.
On any object type:
- Navigate to the Preview Customization tab in Settings.
- Select a view (default or team-specific)
- Add conditional display logic to new or existing cards

Once applied, the property card will only display on the CRM preview sidebar when the defined criteria is met.