
Step right into our newest blog article series, where we're spotlighting the freshest updates straight from HubSpot in 2024!
This edition is all about the latest enhancements to HubSpot CRM, aimed at smoothing your processes, and giving your marketing and sales teams unprecedented capabilities.
Let's dive in and explore these updates together!
What's inside:
1. Deal Insights on Index Page Custom Views
2. AI-Generated Deal Insights in Workspace
3. Interactive workflow diagram highlighting an object's path through a workflow
4. Streamlined filter editing in lists, workflows and views
5. Forms Styling & Layout Customization
Deal Insights on Index Page Custom Views

Deal insights provide a quick overview of Deal information at the top of each of your Deal views.
With this update, when Insights are turned on for a portal, you will now be able to see the Deal Insight section across all of your Deal views on Index pages, instead of only seeing the data on Default Deal views 🎉
Customers have been clear that Deal Insights are super helpful, however, the issue was that they were only available on HubSpot provided Deal default views. This update makes Insights available across all Deal views while still letting individuals hide the Insights section without impacting others who may be using the insights data to aid in their work.
How does it work?
For customers who currently have 'Deal Insights' turned on for their portal, you will now see 'Deal Insights' automatically on all Deal views. You will also be able to see the 'Deal Insights' section on views that you clone and dive into metrics to better understand them.
Diving into Insight metrics:
Click a given statistic to dive into the data more deeply and view what specific record information is rolling up into that given statistic.

From this new window, you will also be able to take further action on this data by selecting from the following options:
- Use In list: Select a List name to create a list with this data
- Export: Export the consolidated data in one click
- Save as report: Select a name and add a description to create a report with this data

Hiding Deal Insights:
You may opt to hide insights view by view to free up the space for your interaction with the table/board or hide the insights at the portal level for all users across all views. Here's how:
Hiding Insights as an Individual (assuming Insights are on for Portal)
1. Select the 'Hide Insights' icon on any Deal view
2. This will hide the insights section FOR YOU on a given view. Others who are utilizing the same view will continue to see the Insights section until they elect to 'Hide' it.
Note: You will need to select 'Hide Insights' for each view you wish to hide it on and hiding the section on a table will also hide it on the board for that view.

Hiding Insights for Your Portal:
1. An Admin may navigate to Deal Setup in Settings. Or select the 'Settings' icon from any Deal Index view
2. Uncheck the icon next to 'Show Deal Insights'
3. This will remove the Deal Insights section from all Default and Custom Deal views and remove the option to 'Show / Hide insights' on any given views for your team.

AI-Generated Deal Insights in Workspace
The deal summary is a high-level snapshot into each deal that provides an understanding of key insights about the deal and its current state. This includes a timely recap of the most recent activities on a deal, risks posed to the deal, and goals of the buyer.
As reps continue to juggle multiple complex deals simultaneously, they need a streamlined way of grasping key information about a deal quickly. The deal summary emphasizes key information about the deal to mitigate information overload, streamline workflows, and help reps close effectively and efficiently.
How does it work?
The deal summary is located in the Deal Context sidebar in the sales workspace.

Navigate to the Deals tab in the workspace, then click on a deal to learn more about the deal's context.

Then, scroll down to view your deal summary.

Click the "copy" icon at the top to share your deal summary, and provide your feedback/thoughts on the quality of the summary at the bottom of the page.
Please note that you will need to turn on "Customer Analysis" in the "AI Assistants" section of your portal settings to access the feature.
Interactive workflow diagram highlighting an object's path through a workflow
The workflow editor now shows the Enrollment History together with the workflow diagram. After selecting an enrollment, the diagram shows the version of the workflow that enrollment experienced, and the path the enrollment followed is highlighted. A side-panel provides details about each step the enrollment took, what happened, and why.
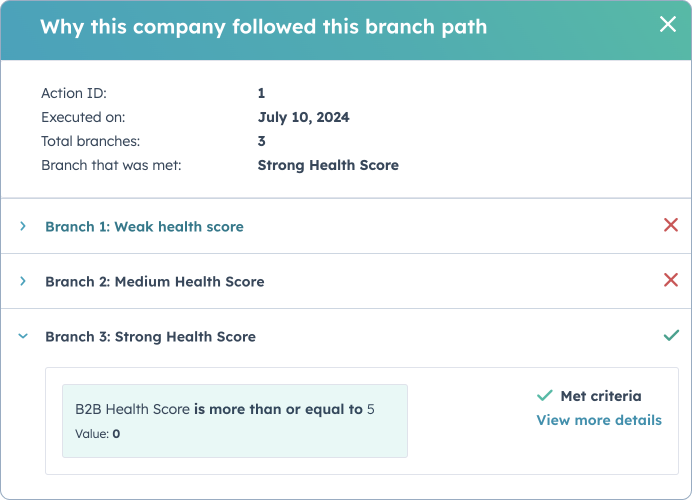
The diagram highlights which branch-paths the enrollment followed.

Tapping on the branch action in the diagram reveals in the panel an explanation of why the contact followed the branch path that is show in the diagram. Similarly, on the enrollment step reveals in the panel an explanation of which enrollment criteria was met.
In the diagram, successful actions are highlighted in green, and any actions with errors are highlighted in red. Meanwhile, the panel lists all of the logs for that enrollment at each step.

While the diagram shows successes and any errors at a glance, the side-by-side panel explains what happened and why. Tapping on any highlighted step in the flow diagram reveals in the panel the full log details and timestamp that matches the selected step.

Customers can now quickly see visually on the workflow editor what happened to any enrollment at every step in the workflow and why. They no longer need to piece together data from the action logs and the version history.
How does it work?
Navigate to Automation > Workflows, and choose any active workflow
From the menu bar, choose View > Enrollment History
From the Enrollment history panel, search for or choose any enrollment from the list
The workflow diagram now highlights what happened to that enrollment, including which branch-paths it followed and which end-point it reached. Meanwhile the side-by-side panel explains what happened and why.

Successful actions are highlighted in green, and any actions with errors are highlighted in red in the diagram and the side panel.

Tapping on any highlighted step in the flow diagram reveals in the panel the full log details and timestamp that matches the selected step.

For the enrollment step the panel also explains exactly why the enrollment happened. For each branch action step, the panel explains why the object continued on the highlighted branch path.

Streamlined filter editing in lists, workflows and views
Now, you can easily copy and paste multiple rows of data extremely easily into lists, workflows, and views.
Many filters within lists and contact views support inputs of multiple values for text strings to allow for better segmentation.
However, you would have to format your data per the filter's input before manually entering each value into the editor. This process was tedious, confusing, and time-consuming!
This update provides a seamless and easy-to-use experience.
How does it work?
Previously, when filtering on a set of values, you would need to format your data and then manually enter each value into the filter editor.
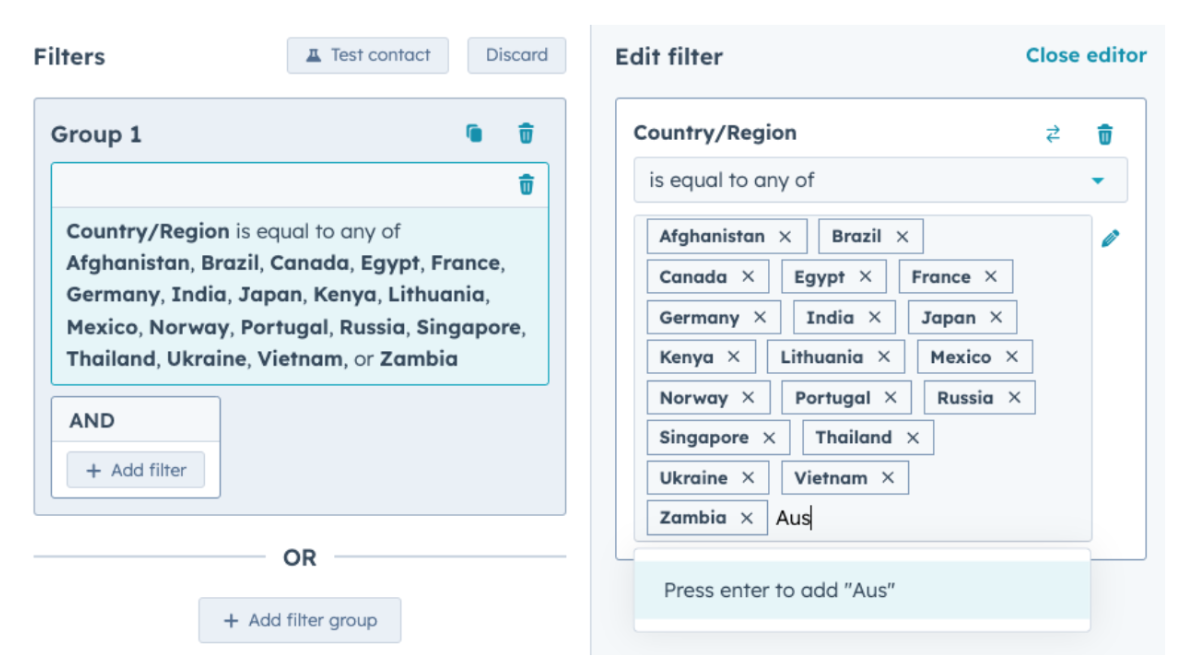
Now, when you need to enter a set of values, you can directly paste them into the input field and see your values automatically sorted for supported formats!

If you have any custom delimiters, you can format your entry by clicking on “edit” to view the “Edit values” modal. You can easily format and view your values here.


Note: This update will support up to 250 values.
Below is a set of operators that this update will work for
- Is equal to any of
- Is not equal to any of
- Contains
- Doesn’t contain
- Starts with
- Ends with
- Has ever been equal to
- Has never been equal to
- Has ever contained
- Has never contained
Note: No existing list, workflow, or views will be impacted by this update
Forms Styling & Layout Customisation
You now have more control over styling your form, making it easier to align your forms design with your visual identity.
Easy to learn, easy to use, and easy to love. Hubspot Forms had enhanced customization and styling tools, allowing you to effortlessly align your forms with your brand's visual identity creating a cohesive and engaging experience for every visitor.
How does it work?
You can set defaults for styling across your form on text, inputs, buttons, background, Any changes will be applied to all steps.
Text
Style your text:
- Fonts (Header, Body)
- Font Size (Header, Body)
- Font Colour (Header, Body)
- Drop Shadow
- Offset
- Direction
- Blur
- Transparency
- Colour
- And with Quick Text Styles

Inputs
Style your input fields:
- Height
- Corner Rounding
- Background Colour
- Border Style
- Border Size
- Border Colour
- Label Text Colour
- Input Text Colour
- Placeholder Text Colour
- Error Text Colour
- And with Quick Field Input Styles

Buttons
Style your buttons:
- Height
- Corner Rounding
- Background Colour
- Gradient
- Drop Shadow
- Font
- Font Colour
- Font Size
- And with Quick Button Styles

Background
Style the Background Style (None, Colour, Image, Gradient) and:
- Border Style
- Border Sides
- Border Colour
- Border Size
- Corner Rounding

Images
Add images to your Forms.

Layouts
And change the layout of your Forms.