Welcome to 2023, the year of possibilities and opportunities! With the ever-evolving technological advancements, businesses are finding it increasingly important to stay on top of the latest trends in digital marketing. One such trend that has gained immense popularity in recent years is inbound marketing, and Hubspot is a leading player in this space.
Hubspot is an all-in-one marketing, sales, and customer service software that helps businesses attract, engage, and delight customers by providing a unified platform to manage all their interactions with prospects and customers. It offers a range of tools and features to help businesses automate their marketing campaigns, track their website traffic and user behavior, and measure the effectiveness of their marketing efforts.
If you're new to Hubspot and looking to get started, you've come to the right place. In this practical, step-by-step guide, we'll walk you through the basics of getting started with Hubspot and show you how to use it to achieve your business goals. We'll cover everything from setting up your account, to measuring your success and improving your results.
Whether you're a marketer, salesperson, or business owner, this guide will help you understand how to leverage Hubspot to grow your business. So, let's get started!
Start by adding key users and creating their accounts
You might want to start by adding users to your Hubspot portal. We recommend that you only add the few important users that will be designated as Super Admins at this point. Since you first want to set everything up nicely, customise it to your business and then get your team onboard to start using Hubspot. Adding too many users already might cause confusion, especially if they are new to the software. Of-course, you can always them all later. So let's look at the steps for adding new users to your Hubspot portal.
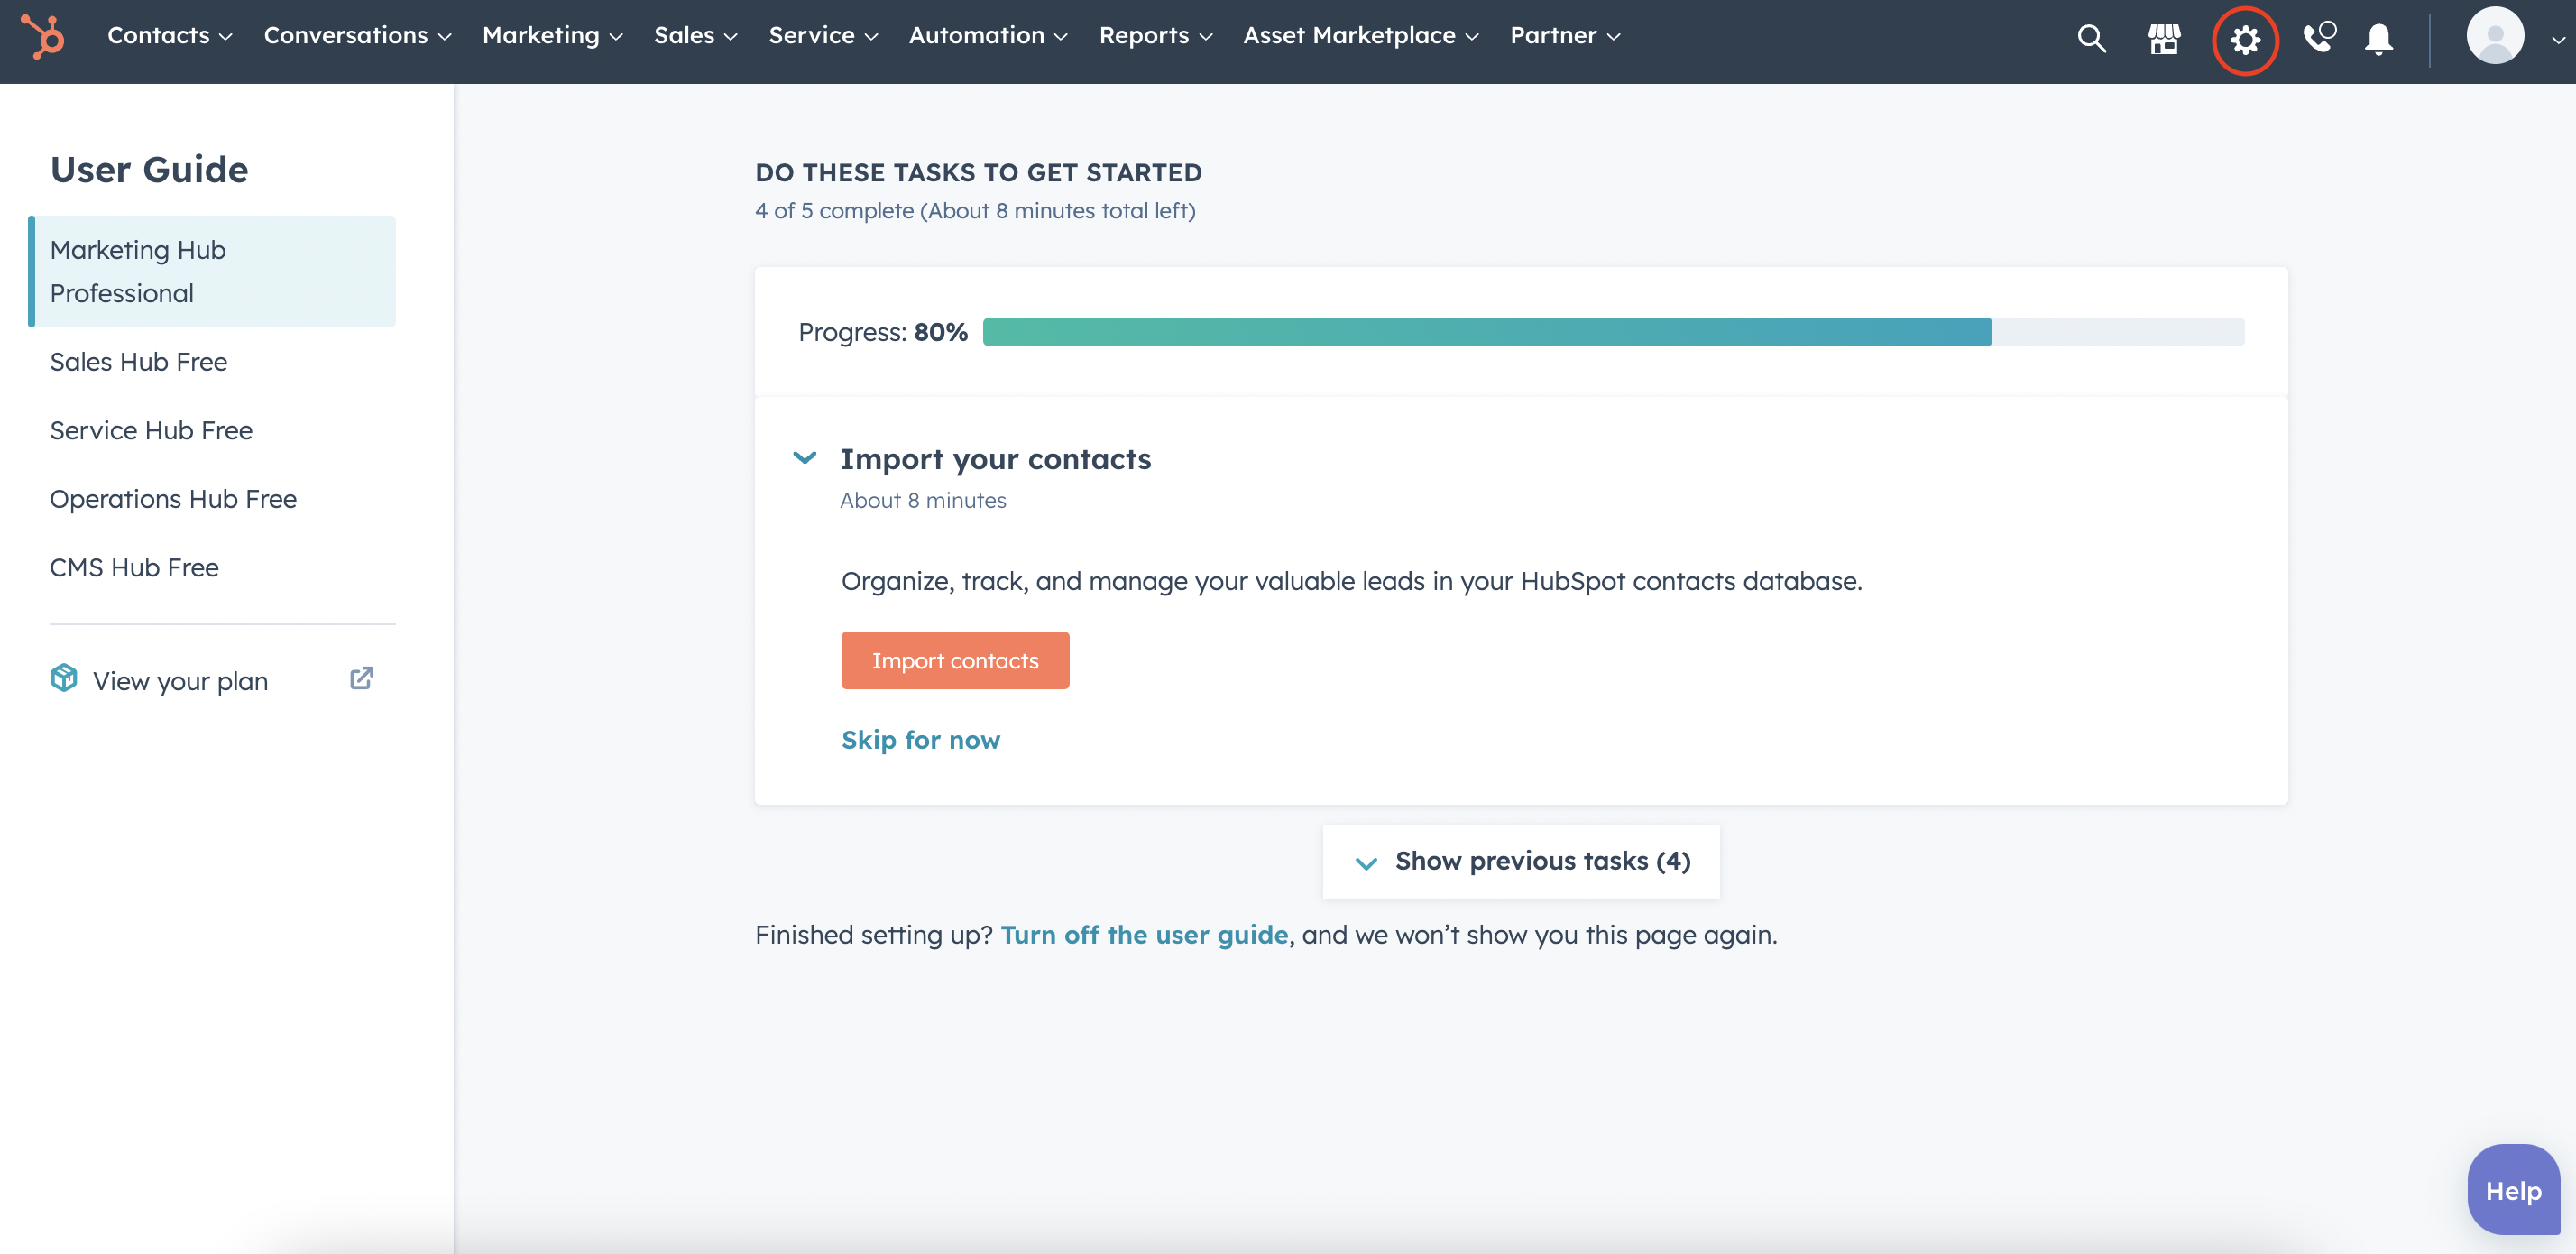
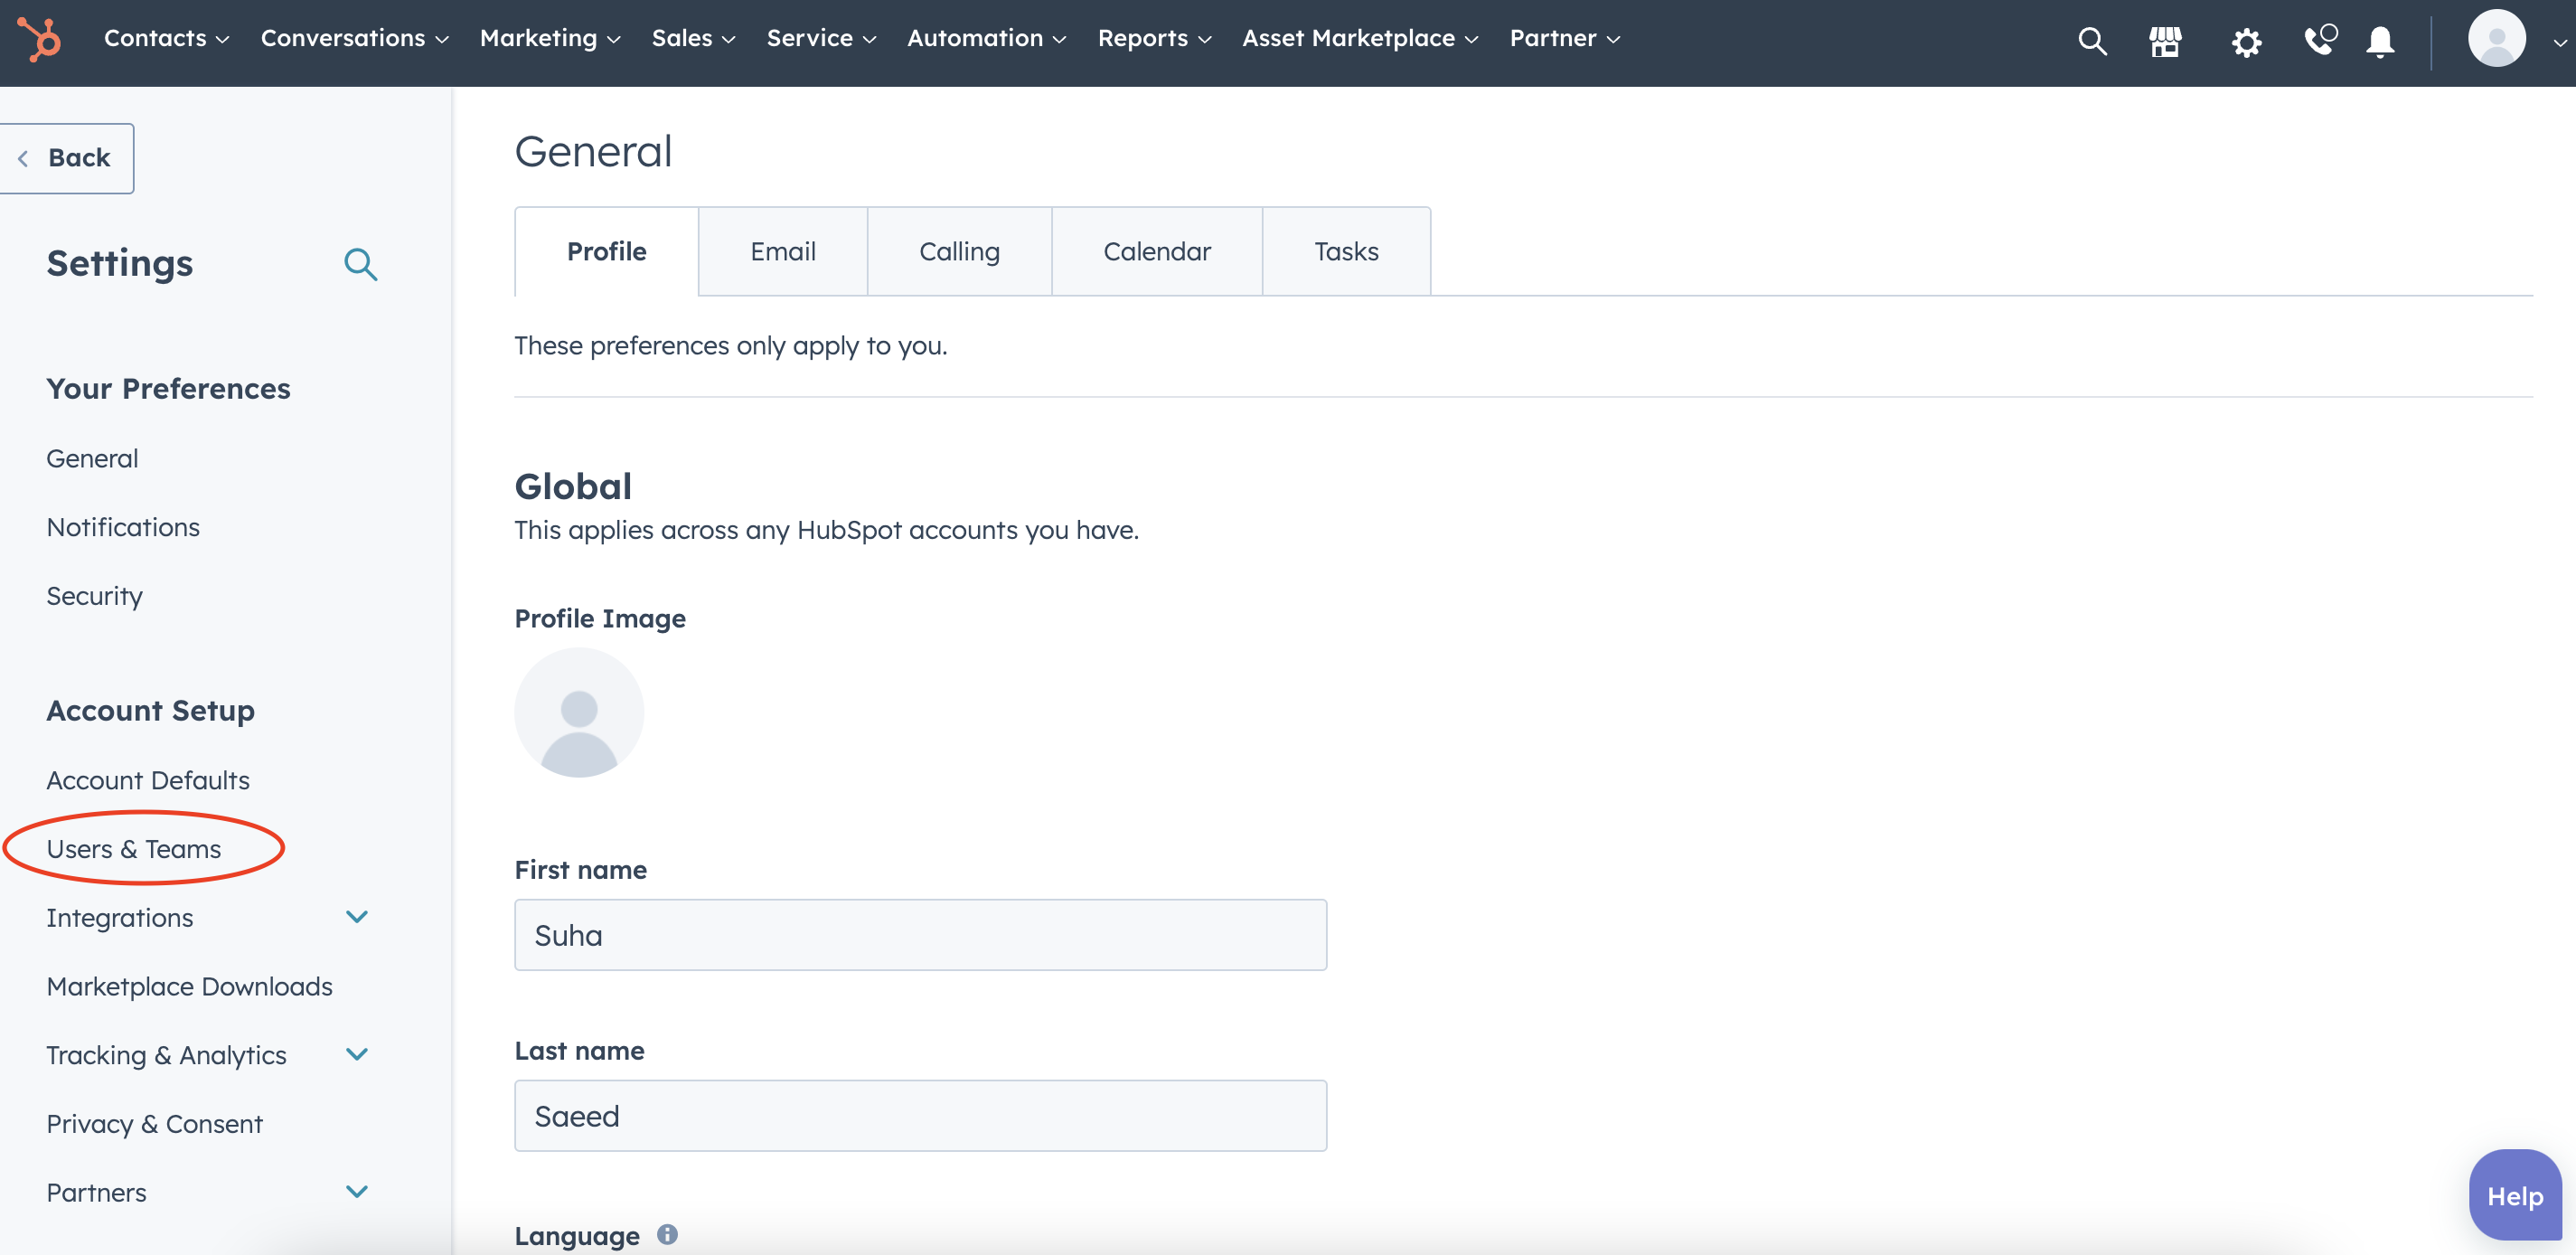
Log in to your HubSpot account. Look for the gear icon on the top right - this is the settings.Click on it and look for "Users & Teams" in the left panel
- In the "Users & Teams" section, click the "Create user" button (Orange button on the top right) to open the user creation form.
- Enter the user's email address, first name, and last name.
- Select the user's role from the dropdown menu. HubSpot offers several predefined roles with different levels of access, including "Administrator", "Marketer", "Sales", and "Service". You can also create custom roles with specific permissions.
- If the user will be part of a team, select the team from the dropdown menu. You can create new teams in the "Teams" tab.
- Optional: assign the user to one or more "Owner" teams. Owner teams have access to all objects owned by them and their child teams.
- Optional: select the "Grant user access to all objects" checkbox to give the user access to all objects in your account. If unchecked, you'll need to manually grant access to individual objects or groups of objects.
- Click the "Create user" button to save the user.
The new user will receive an email invitation to join your HubSpot account. They'll need to follow the instructions in the email to create a password and log in.
- Note that HubSpot charges for each user added to your account, so be mindful of your subscription plan and user limits. You can always upgrade your plan or remove users as needed.
Once you've added a few key users to your portal you now want to start connecting your website with Hubspot and start collecting leads directly in the CRM.
To Connect your website you will need to add the Hubspot tracking codes to your website
- Get into settings once again and click on “Tracking and Analytics” in the left panel.
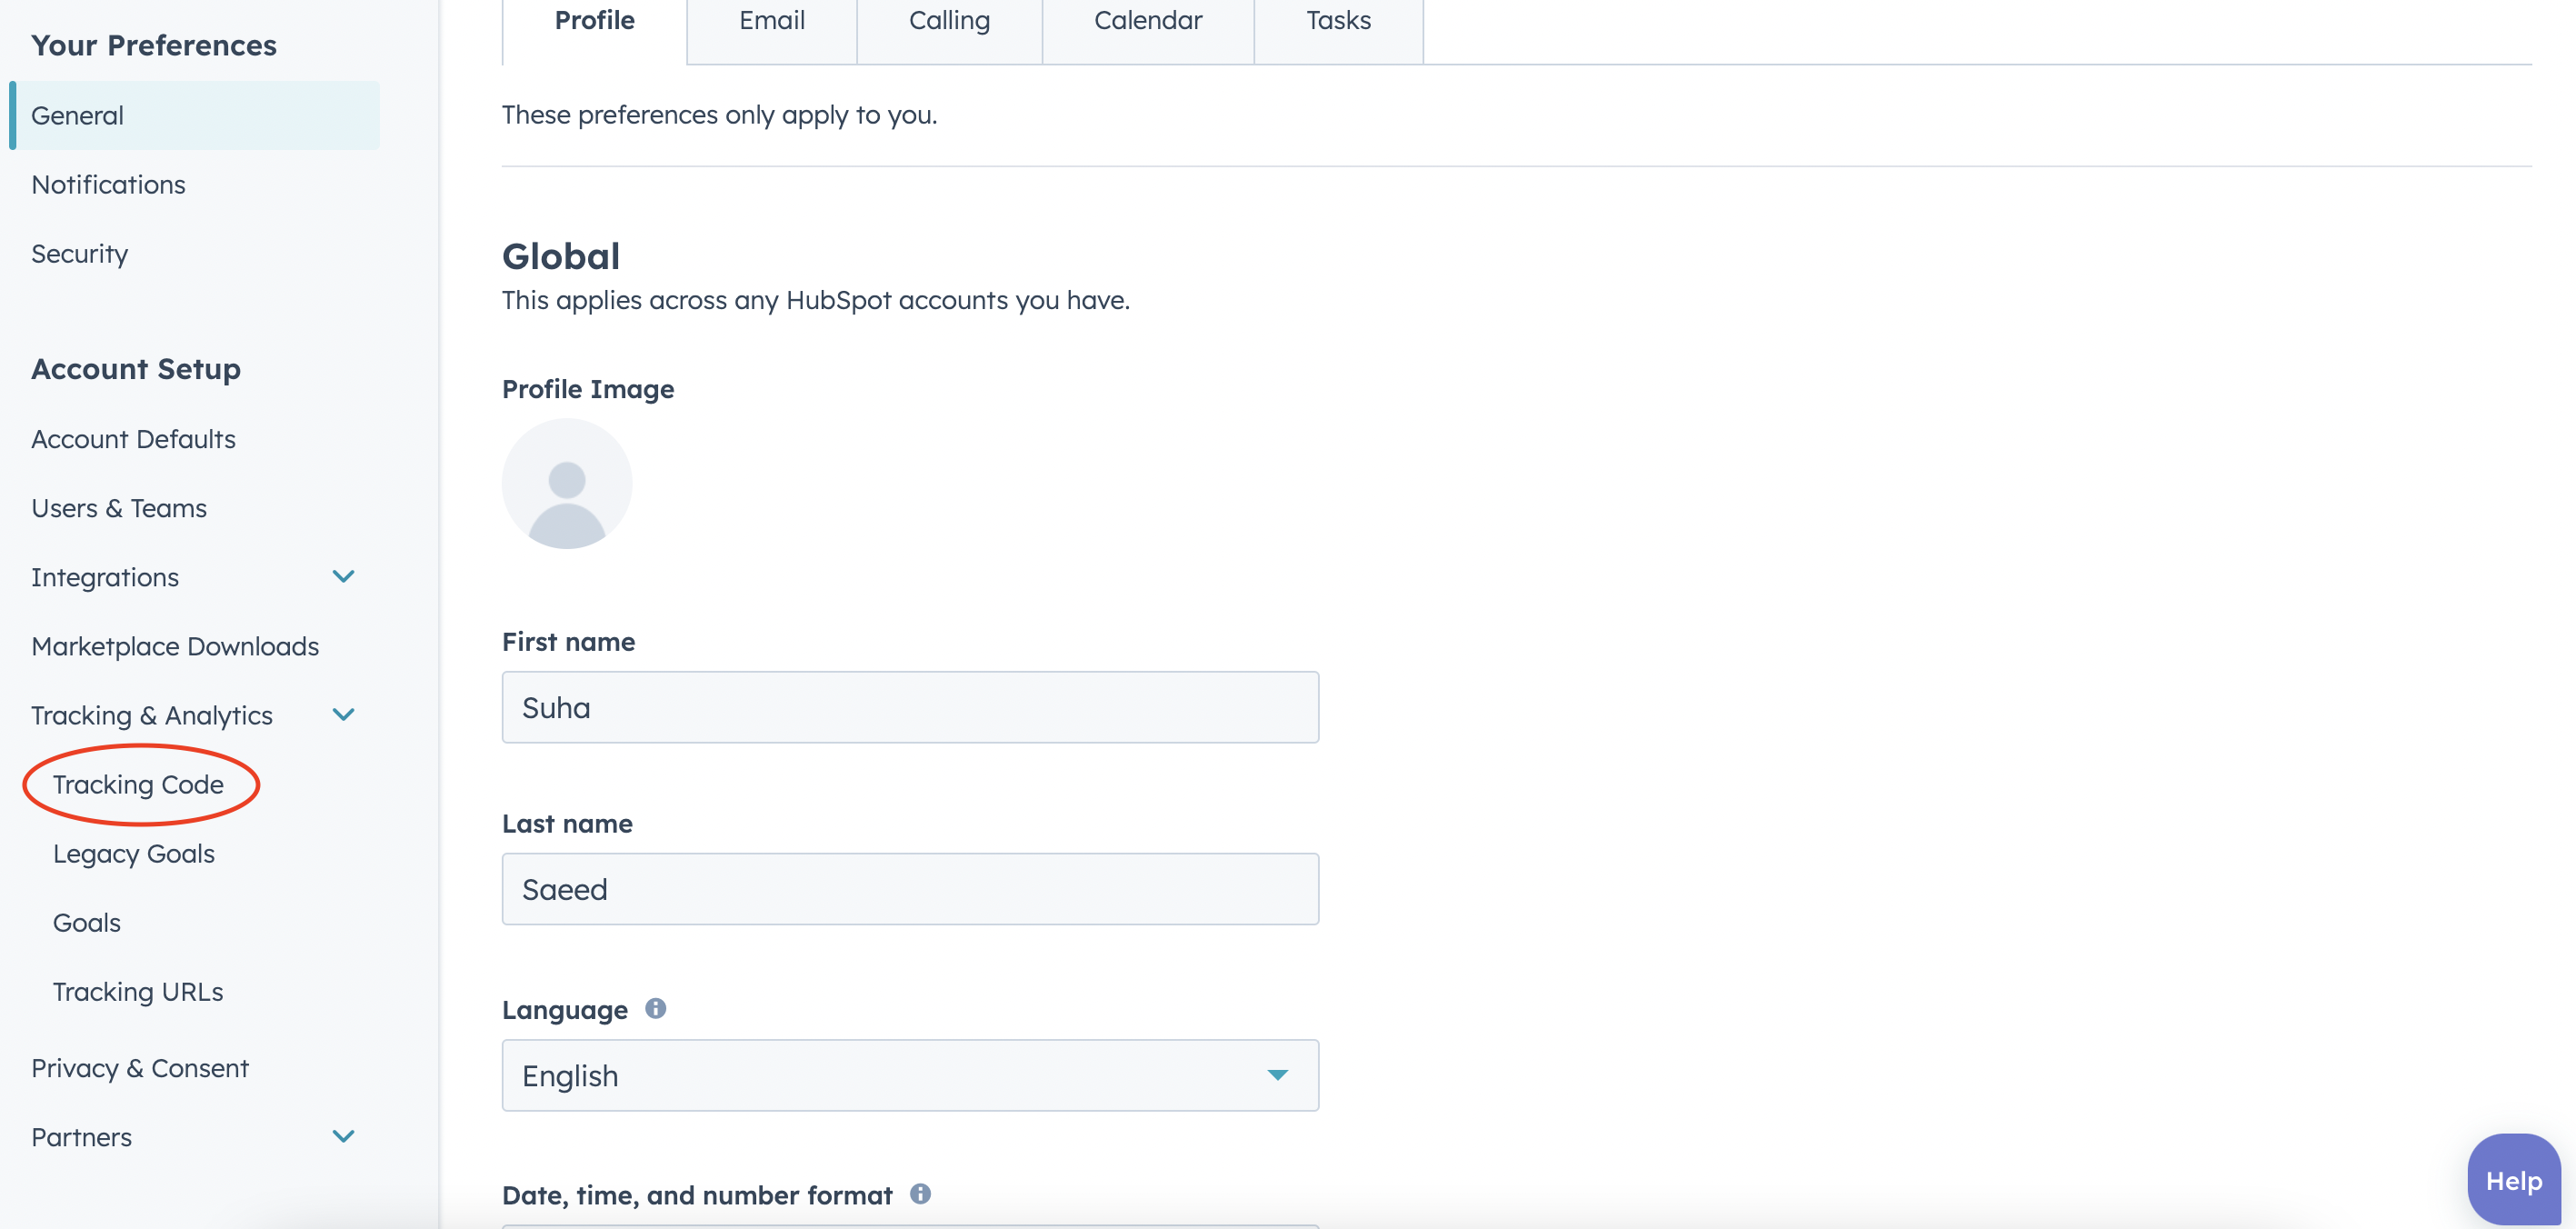
- Click on "Tracking Code"
- Click the "Install tracking code" button to generate your HubSpot tracking code snippet.
- Copy the tracking code snippet to your clipboard.
- Paste the tracking code snippet just before the closing </head> tag of your website's HTML code.
- Save your changes and publish your website.
- Note that if you're using a content management system (CMS) like WordPress or Drupal, you may need to use a plugin or extension to add the HubSpot tracking code to your website. Check the HubSpot knowledge base or consult with your website developer or CMS provider for specific instructions.
The most recommended method to add the tracking code is through the Google tag manager.
To add HubSpot tracking code to your website through Google Tag Manager, follow these steps:
- Log in to your Google Tag Manager account and create a new tag.
- Name the tag something like "HubSpot Tracking Code".
- Select the "Custom HTML" tag type.
- In your HubSpot account, navigate to the "Tracking Code" section in your account settings.
- Copy the HubSpot tracking code snippet.
- In Google Tag Manager, paste the HubSpot tracking code snippet into the "HTML" field.
- Under "Triggering", select "All Pages" to fire the tag on every page of your website.
- Save your changes and publish your tag.
- Note that this method requires that you have already set up Google Tag Manager on your website. If you haven't done so, you'll need to follow the steps to install the Google Tag Manager tracking code first.
- Also, be aware that it may take some time for HubSpot to start collecting data from your website after you've added the tracking code. It's a good idea to test the tracking code using the HubSpot tracking code checker to make sure it's working properly.
Moving onto one of Hubspot's most insightful tools, the website analytics. Hubspot's website analytics provides users with valuable insights into how their website is performing and how visitors are interacting with it. It tracks visitor behavior, including how visitors navigate through the site, which pages they visit most frequently, and how long they spend on each page. This information helps you understand which content is most engaging to your audience and how to optimize your website for better performance. It also provides detailed information on website conversions, including which pages are driving the most conversions and which calls-to-action are most effective. This information will help you optimize your website for better conversion rates.
Overall, Hubspot's website analytics provides you with a comprehensive view of your website's performance, allowing you to make data-driven decisions to improve your online presence and drive more leads and conversions
To view website analytics in HubSpot, follow these steps:
- Navigate to the "Reports" section.
- Click "Analytics Tools" in the dropdown menu, then click "Traffic Analysis" in the submenu.
- On the "Sources" tab, you'll see a graph summary of your website analytics, including metrics like pageviews, sessions, and bounce rate.
- To view more detailed analytics, click on the "Reports" tab. Here, you can view reports on page performance, traffic sources, and visitor behavior.
- To create a custom report, go to 'Report' > 'Report' and then click the "Create Report" button. You can choose from a wide range of report types and customize your report with specific metrics and filters.
- To track specific pages or events on your website, you can set up custom tracking in HubSpot. Click "Tracking Code" in the left-hand menu, then click "Custom Tracking". Here, you can set up tracking for specific URLs, events, or JavaScript functions.
- To integrate your website analytics with other tools in HubSpot, such as email marketing or CRM, you can set up tracking and attribution. HubSpot provides detailed documentation on how to set up tracking and attribution for different scenarios.
Connect your domains
To connect an email sending domain in HubSpot, follow these steps:
- Go to the "Settings" section.
- Click "Marketing" in the left-hand menu, then click "Email" in the submenu.
- Scroll down to the "Domains" section and click the "Connect Domain" button.
- Enter the domain name you want to use for email sending. This should be a domain that you own or control, such as your company's website domain.
- HubSpot will provide you with a set of DNS records that you need to add to your domain's DNS settings. These records are used to verify ownership of the domain and set up email authentication.
- Log in to your domain registrar or hosting provider's account and navigate to the DNS management section.
- Add the DNS records provided by HubSpot to your domain's DNS settings. The specific steps for doing this will vary depending on your domain registrar or hosting provider. HubSpot provides detailed instructions for many popular providers in their documentation.
- Once you've added the DNS records, click the "Verify Domain" button in HubSpot. It may take a few minutes for the DNS changes to propagate.
- If the verification is successful, you'll see a green checkmark next to your domain name in HubSpot. You can now use this domain for email sending.
- Note that email sending domains must be authenticated using SPF, DKIM, and DMARC protocols to ensure that emails sent from your domain are not marked as spam. HubSpot provides detailed instructions on how to set up these protocols in their documentation. It's also a good idea to warm up your email sending domain gradually by sending emails to small lists at first and gradually increasing the volume over time.
Connect your personal email
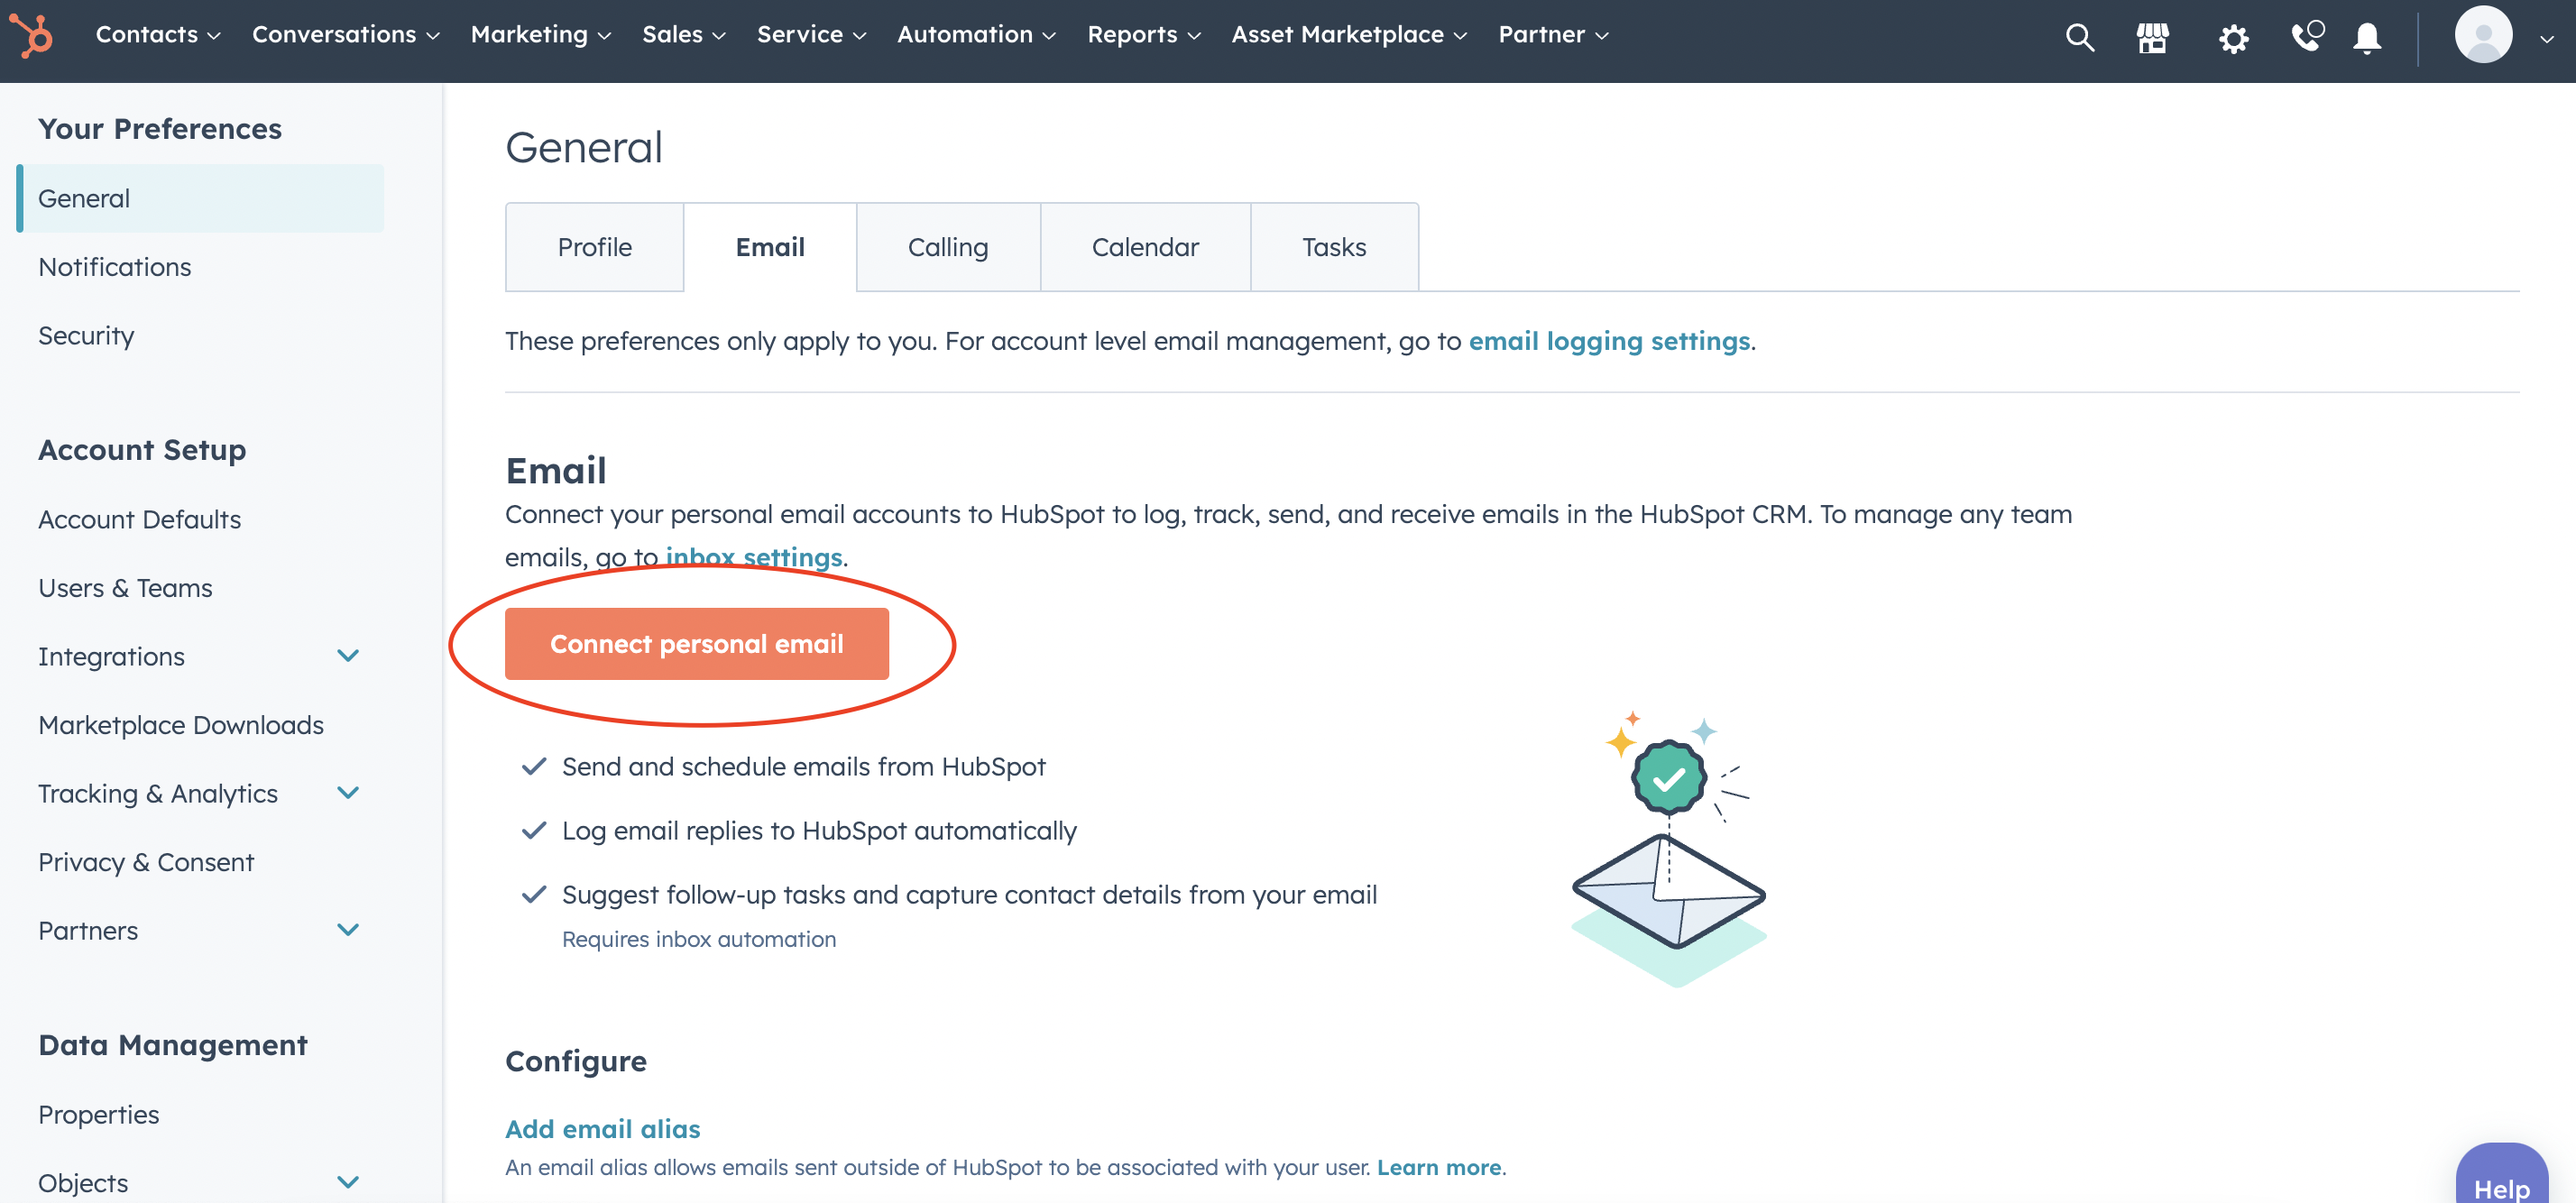
To connect your personal email in HubSpot, follow these steps:
- Go to the "Settings" section.
- Click "Email" in the submenu.
- Click the "Connect personal email" button.
- Select your email provider from the list of options. HubSpot supports a wide range of email providers, including Gmail, Outlook, and Yahoo.
- Follow the prompts to authenticate your email provider. You may be asked to log in to your email account and grant HubSpot access.
- Once you've authenticated your email provider, select the email account you want to connect to HubSpot.
- HubSpot will ask you to grant permission to access your email account. Review the permissions and click "Allow" to grant access.
- Once your email account is connected, you'll be able to send and receive emails directly from HubSpot. Your emails will be automatically logged in HubSpot, and you'll be able to track opens and clicks, create templates, and more.
- Note that connecting your personal email in HubSpot may require additional configuration, depending on your email provider and settings. HubSpot provides detailed instructions for many popular email providers in their documentation. It's also a good idea to test your email settings by sending a few test emails and checking that they're being logged and tracked properly in HubSpot.
Personalise your CRM views
To personalize contact and deal records in HubSpot, follow these steps:
- Click the "Contacts" or "Deals" tab to view your list of records.
- Click on a record to open it in detail view.
- To add or remove fields from the record, click the "Actions" dropdown menu and select "Edit properties". You can then select the checkboxes next to the fields you want to add or remove. Click "Save" to apply your changes.
- To add a custom property to the record, click the "Add property" button in the properties section. Enter the name of the property and select the property type. You can then enter a value for the property.
- To customize the record layout, click the "Actions" dropdown menu and select "Customize record view". You can then drag and drop fields to reorder them or click the "X" button to remove fields.
- To add custom sections to the record layout, click the "Add section" button. You can then enter a name for the section and drag and drop fields into the section.
- Once you've customized the record, click the "Save" button to apply your changes.
- You can also create custom views for your contacts or deals by clicking the "Actions" dropdown menu and selecting "Save view as". Enter a name for your new view and select the criteria you want to filter by. You can then save the view for future use.
- Note that the customization options available for contact and deal records may vary depending on your subscription plan and user permissions. HubSpot provides detailed documentation on how to personalize your contact and deal records for different plans and scenarios. It's also a good idea to periodically review and update your contact and deal record layouts and views to ensure that they're tailored to your specific needs and workflows.
Import contacts data
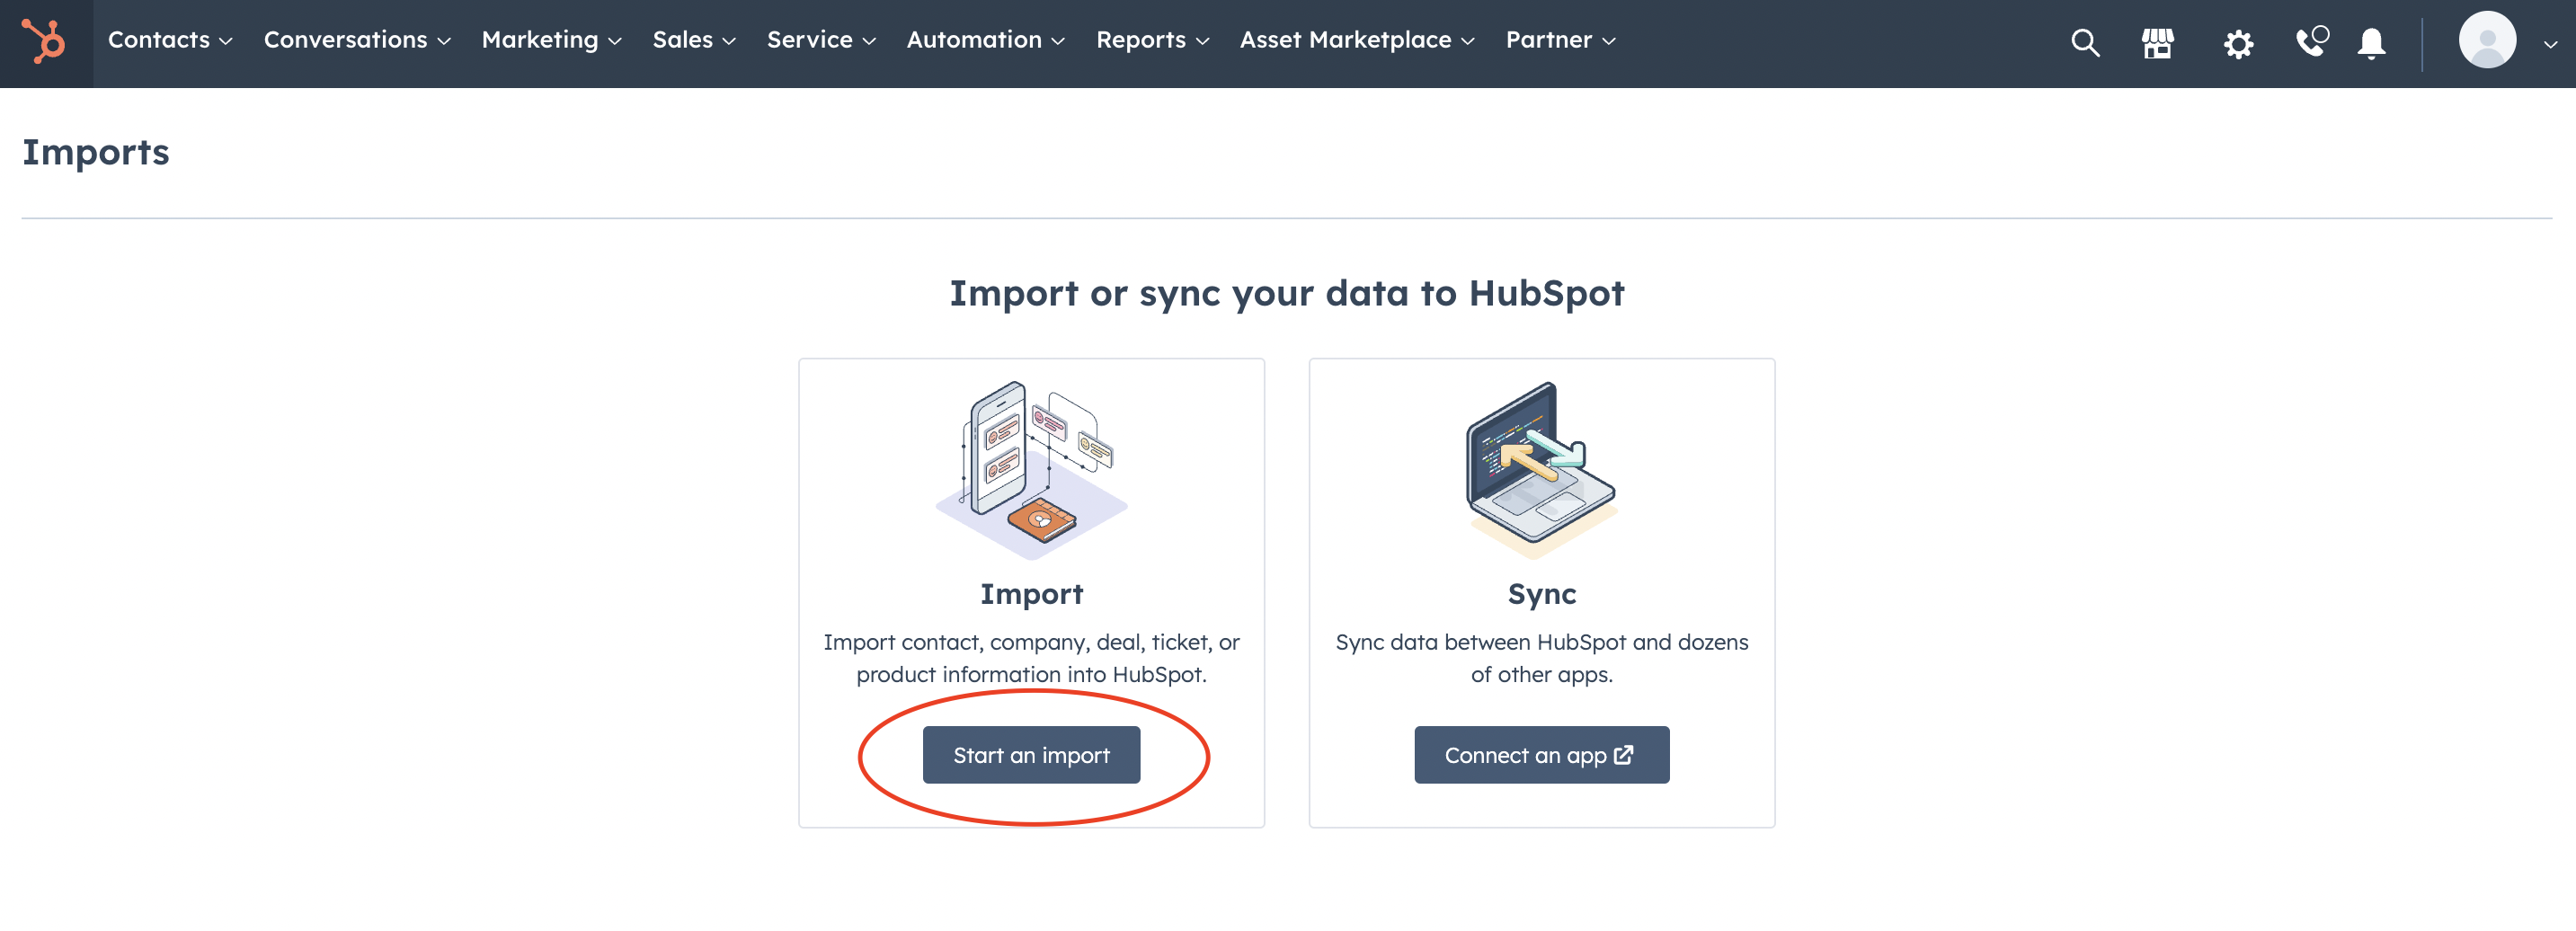
To import contacts data in HubSpot, follow these steps:
- Navigate to the "Contacts" section.
- Click the "Import" button in the upper right corner.
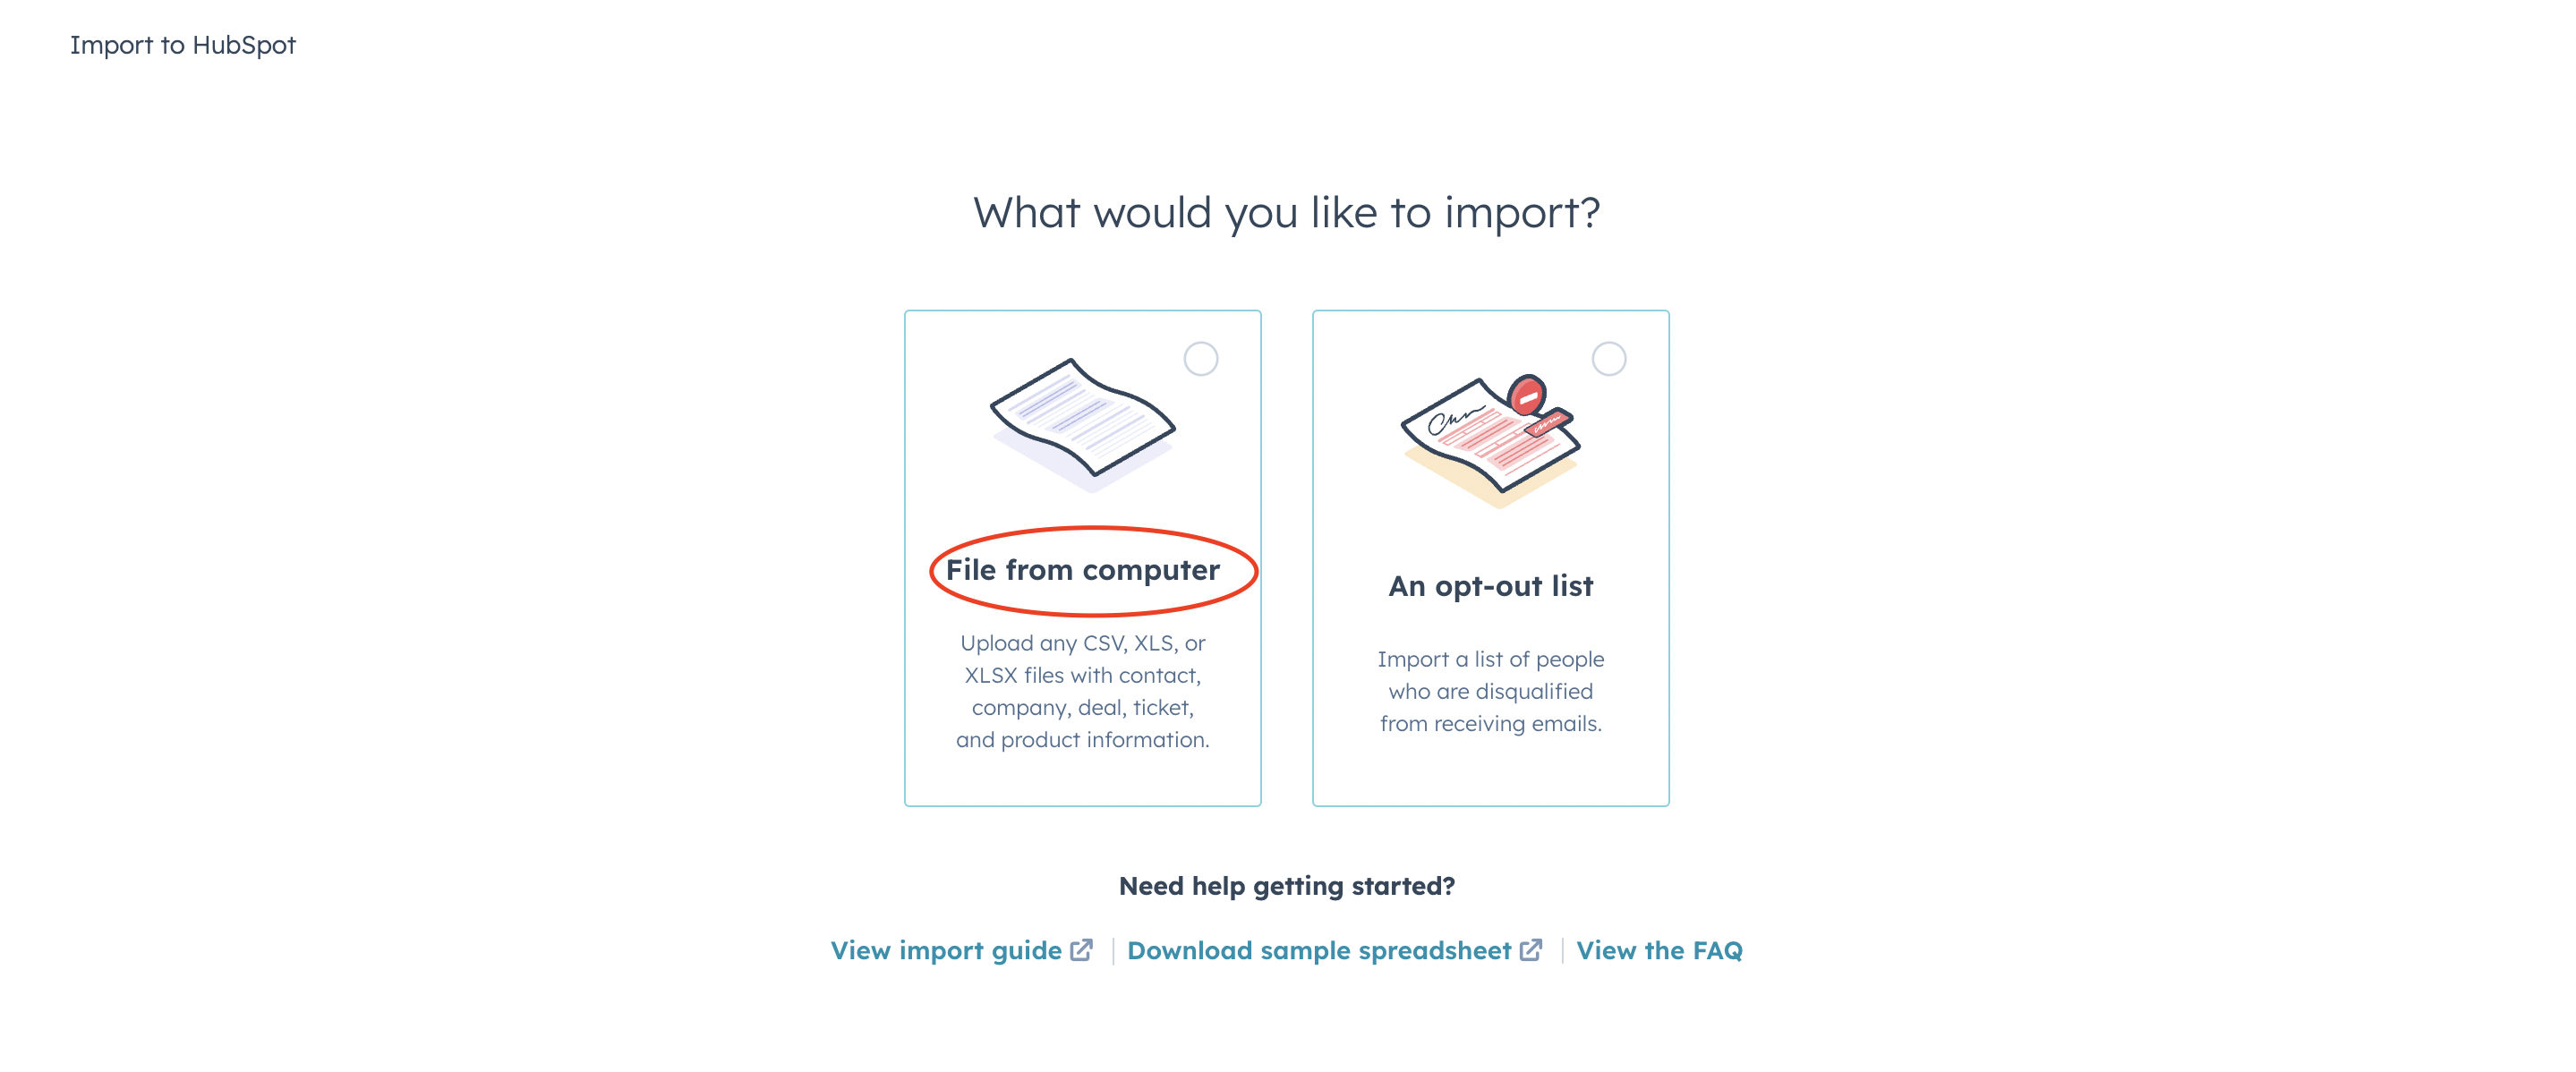
- Click on 'Start an import' and choose the file you want to import. HubSpot supports several file formats, including CSV, XLS, and XLSX.
- Map your columns. HubSpot will display a preview of your data and ask you to map your columns to HubSpot properties. You can select from existing properties or create new ones.
- Set your import options. HubSpot offers several import options, including the ability to update existing records or ignore duplicate records.
- Click "Import" to start the import process. Depending on the size of your file, the import may take several minutes to complete.
- Once the import is complete, HubSpot will display a summary of the results, including the number of records imported and any errors or warnings that occurred.
-
Note that HubSpot has specific requirements for importing contacts data, including the format of your file, the number of records, and the properties you're importing. It's also a good idea to clean and prepare your data before importing it to HubSpot. This includes removing duplicate records, standardizing formatting, and verifying that all required fields are present. By taking these steps, you can ensure that your data is accurate and up-to-date, which will help you get the most out of your HubSpot account.
Connect Social Media and Ad accounts
HubSpot supports a wide range of social media channels that you can connect to your account, including:
- YouTube
- Google My Business
- Vimeo
- Tumblr
By connecting your social media channels to HubSpot, you can manage your social media presence, create and schedule posts, and track your social media performance all in one place. You can also set up social media monitoring to track mentions of your brand or keywords, and engage with your audience directly from the HubSpot social media dashboard.
In addition, HubSpot offers advanced social media features for paid advertising, including ad creation, targeting, and tracking. By connecting your social media ad accounts to HubSpot, you can manage your campaigns alongside your other marketing activities and track your ROI more effectively.
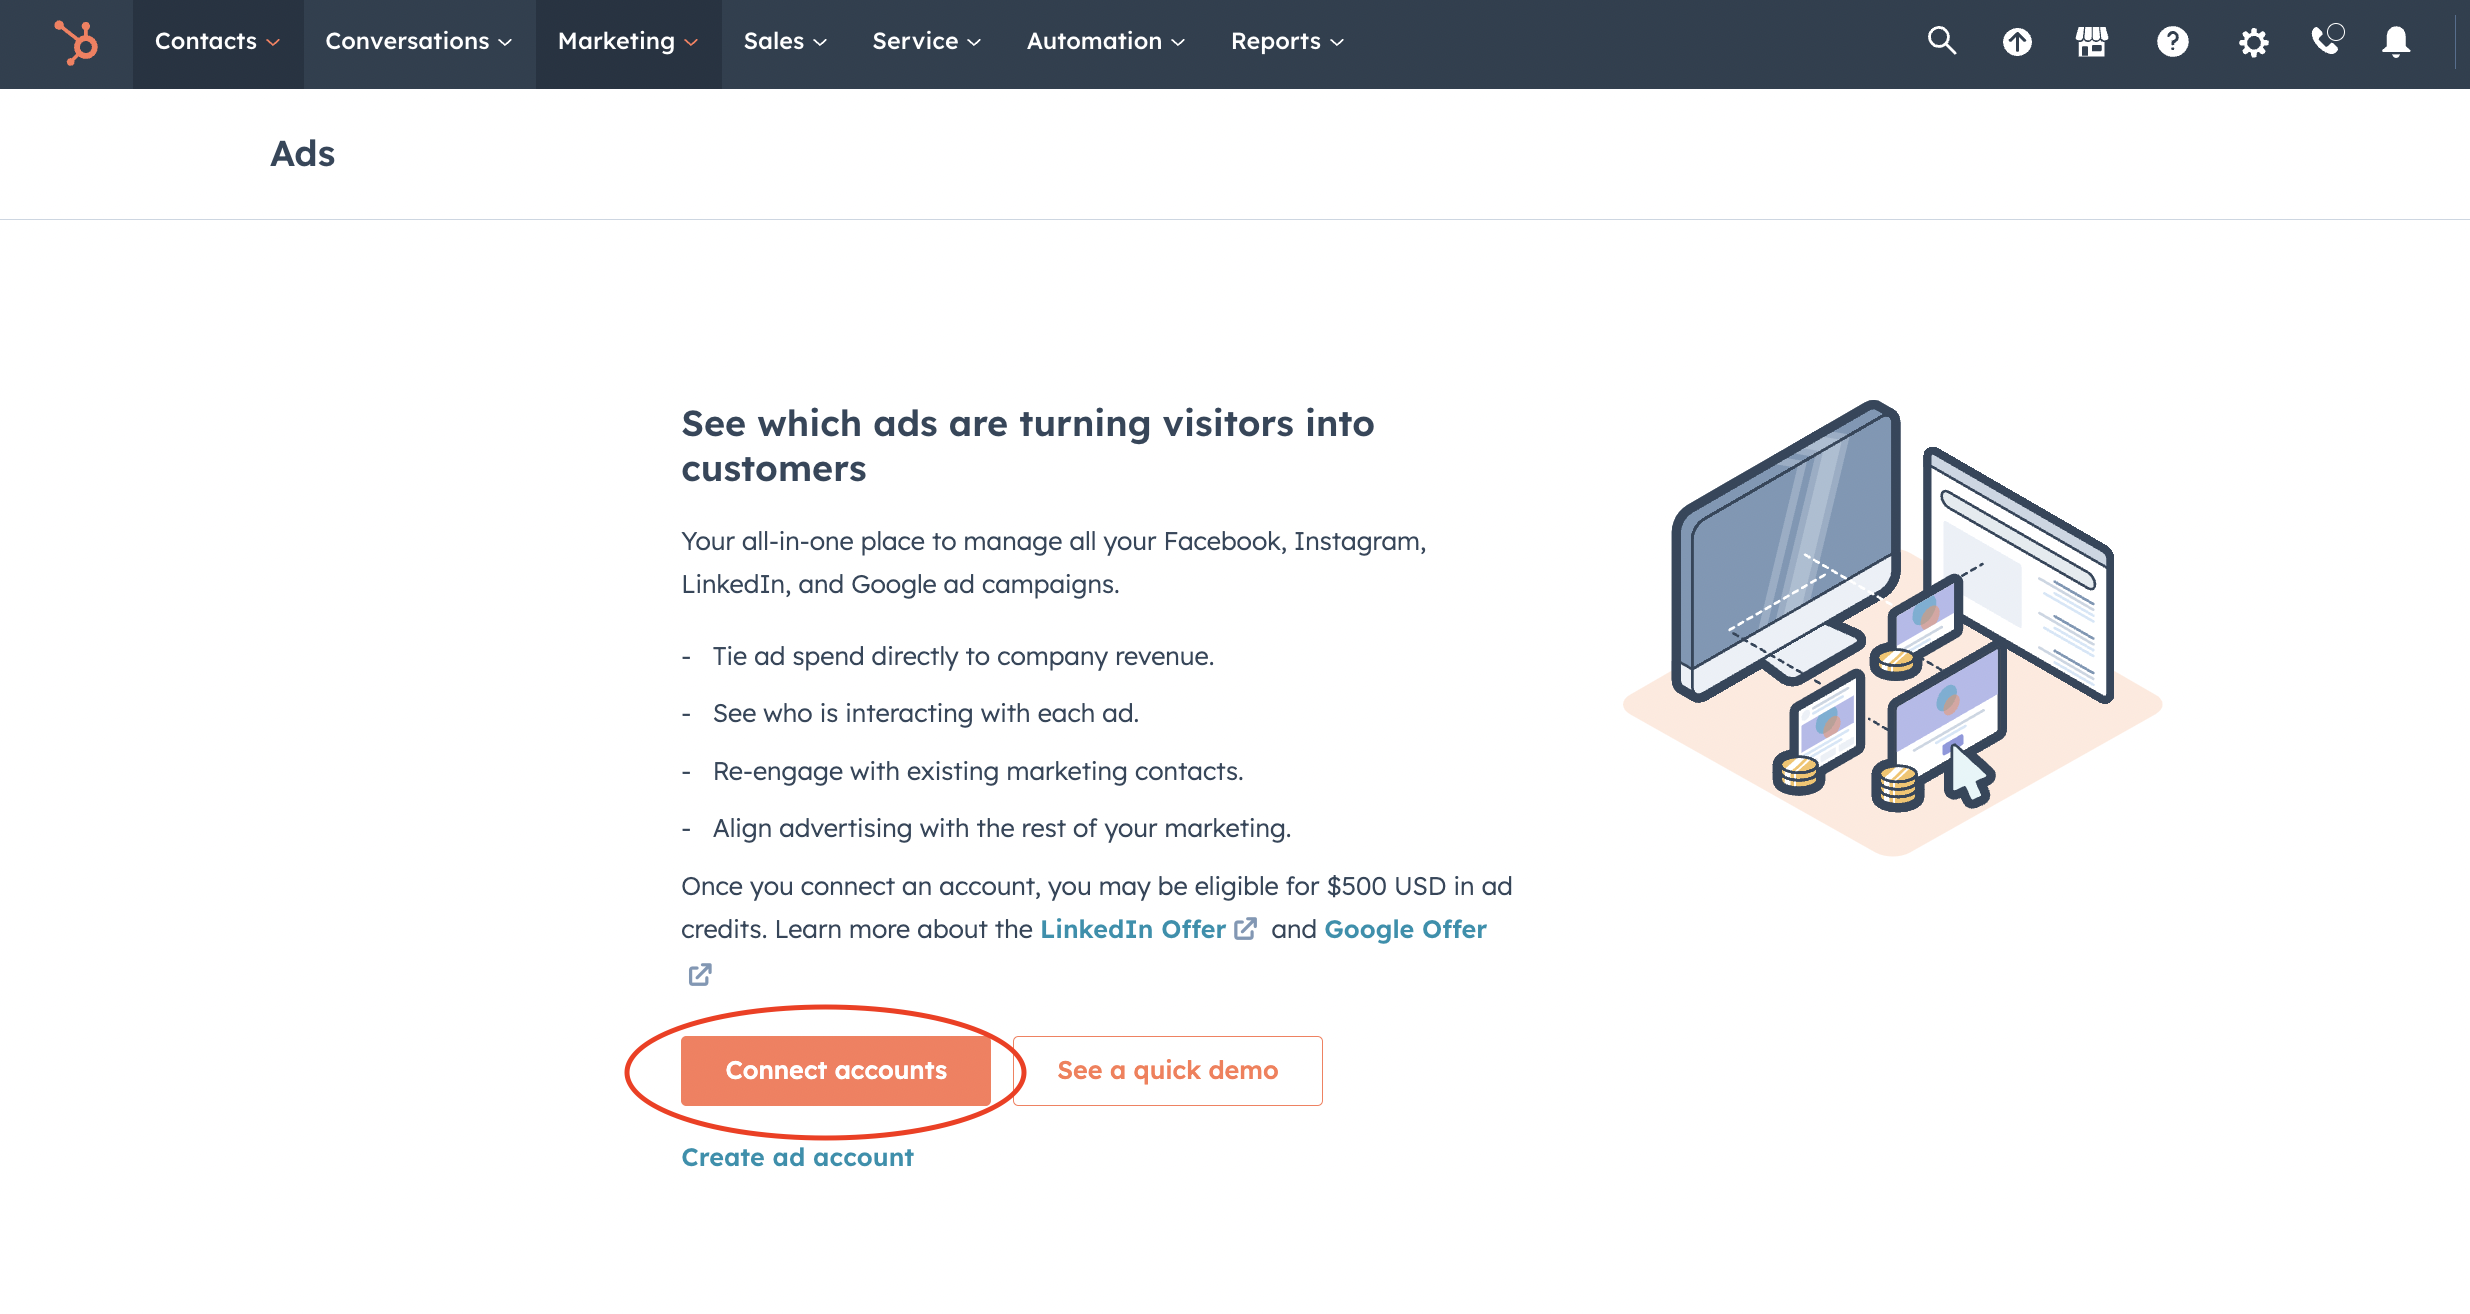
To connect social media and ad accounts in HubSpot, follow these steps:
- Go to the "Marketing" section.
- Click "Ads" in the dropdown menu, then click "Linked accounts" in the submenu.
- Click the "Connect Account" button next to the social media or ad platform you want to connect. HubSpot supports a wide range of platforms, including Facebook, Instagram, LinkedIn, and Google Ads.
- Follow the prompts to authenticate your account. You may be asked to log in to your account and grant HubSpot access.
- Once you've authenticated your account, HubSpot will import your ad account data and set up tracking for your campaigns.
- To view your ad account data in HubSpot, click the "Ads" tab in the dropdown menu. You'll be able to see metrics like ad spend, clicks, and conversions for your campaigns.
- To create and manage social media posts and campaigns in HubSpot, click the "Social" tab in the dropdown menu. You can schedule and publish posts, monitor engagement, and track your social media performance.
- Note that connecting social media and ad accounts in HubSpot may require additional configuration, depending on your account settings and permissions. HubSpot provides detailed instructions for many popular platforms in their documentation. It's also a good idea to periodically review and update your social media and ad account settings in HubSpot to ensure that they're optimized for your goals and objectives.
Setting up Reports & Dashboards
Reports and dashboards in HubSpot are essential tools that enables you to measure and track your marketing, sales, and customer service efforts effectively. It provides you with real-time insights into your business performance, allowing you to make data-driven decisions.
Reports/Dashboards:
Navigate to the "Reports"/"Dashboard" section.
- Click "Dashboards/Reoprt" in the dropdown menu, then click "Create dashboard/report" at the top.
- Choose the type of dashboard/report you want to create. HubSpot offers several pre-built templates for marketing, sales, and service metrics.
- Customize your dashboard/report layout and design. You can rearrange your layout, and choose a color scheme that fits your brand.
- Choose your widgets. HubSpot provides a wide range of report widgets that you can add to your dashboard, including charts, tables, and funnel reports.
- Set up your filters and date range. You can filter your data based on specific criteria, such as contact properties or deal stages, and set the date range for your report/dashboard.
- Preview and test your dashboard. HubSpot provides a preview of your dashboard, allowing you to test and refine your report widgets before finalizing your dashboard.
- Save and publish your dashboard/report. Once you're happy with your dashboard/report, you can save it and publish it to your team or stakeholders.
- Schedule your dashboard/report delivery. HubSpot allows you to schedule your dashboard/report for automatic delivery via email or Slack, making it easy to stay up-to-date on your key metrics and performance data.
- Note that setting up reports in HubSpot may require additional configuration and setup, depending on your data sources and report requirements. It's important to thoroughly research and evaluate your reporting needs and to ensure that you're using accurate and reliable data sources. HubSpot provides detailed documentation and support for creating and managing reports, and it's a good idea to periodically review and update your reports to ensure that they're providing the insights and information you need to make informed business decisions.
In conclusion, Hubspot is a powerful tool that can help businesses of all sizes streamline their marketing, sales, and customer service efforts. With its wide range of features and user-friendly interface, Hubspot has become one of the most popular marketing automation platforms available today.
In this article, we've provided a practical, step-by-step guide to help you get started with Hubspot in 2023. From setting up your account to creating reports, we've covered everything you need to know to get the most out of Hubspot.
By following these steps and putting in the time and effort to learn the platform, you can take your business to the next level and achieve the success you've been working towards. Whether you're just starting out or looking to take your marketing to the next level, Hubspot is the tool you need to help you get there.
So, what are you waiting for? Start your journey with Hubspot today! With the right strategy and the right tools, there's no limit to what you can achieve. Good luck, and happy marketing!